
Managing large PPC campaigns manually is not only overwhelming, but it’s also prone to human error.
Google Ads Editor (previously known as Google Adwords Editor) allows you to eliminate the complexity of running large scale campaigns and makes account-level changes easier.
So, if you’re struggling to keep track of your PPC accounts, campaigns, and ad-groups, then this article will help you to manage your ad campaigns better.
So What is Google Ads Editor?
Google Ads Editor is a free downloadable application that lets you make bulk Google Ads campaigns changes quickly and easily.
To download Google Ads Editor, simply sign in to your Google account and download it here (see screenshot below):

NB! If your download link doesn’t work, make sure you turn off your ad-blocker.
What Are the Benefits of Google Ads Editor?
Google Ads Editor has many benefits.
The application lets you make account-level changes to your campaigns in one click.
These changes include:
- Keyword changes
- Raising and lowering bids on your keywords
- Changing keyword match types
- Changing final destination URLs or Display URLs
- Copying & pasting entire campaigns from Google Sheets to push them live
- Google Ads Editor can be used to work offline.
Essentially, Google Ads Editor reduces the time it takes to make a large number of changes.
Tasks that used to take a few hours now take a few minutes.
HELP ME WITH LARGE-SCALE PPC CAMPAIGNS
The Disadvantages of Adwords Editor
Google Ads Editor also has its drawbacks.
The tool is still relatively manual and doesn’t allow for automation.
So, whilst Adwords Editor can assist you in making the changes, it isn’t actively making suggestions based on live data, so you may not always be able to capitalise on the best situations.
Simply put, the tool lacks the ‘intelligence’ that the modern-day Javascripts can provide.
Another disadvantage is that the data stored in the Adwords Editor is not a live version of your account; this means that any changes you make towards your account won’t go live until you’ve ‘posted’ them.
This isn’t a problem if you’re the only person to work on your account, however, if you have multiple people working on your Google Ads account then it’s best to ‘update’ and pull the most recent account data in first (we’ll cover that later).
How to Set Up Google Ads Editor in 4 Easy Steps
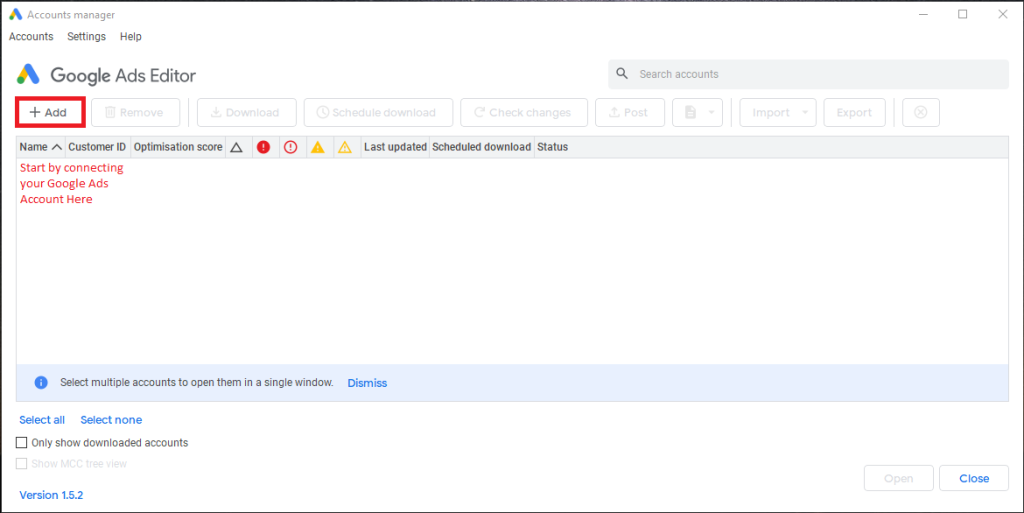
When you first land on your Google Ads Editor landing page, you’ll need to install the program to begin. Once you have it installed, you’ll see that you have no account data yet (see below):
Follow these step-by-step instructions below to integrate your Google Ads account with Google Ads Editor.
STEP 1:
Start by connecting your Google Ads account by clicking “Add” or by pressing Ctrl+N on your keyboard (see below):
STEP 2:
Click “Open Browser to Sign In” (see image below):

STEP 3:
Select your appropriate Gmail account and then click “Allow”. Google will then give you a code to copy and paste into the editor interface (see image below):

STEP 4:
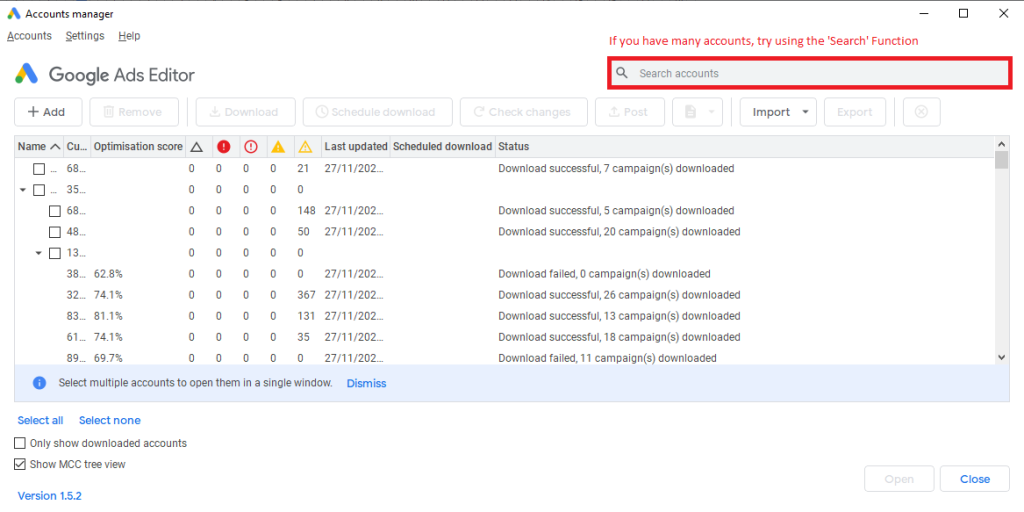
Once you have your account(s) downloaded, you can access the edit interface by double-clicking on your account(s).
If you have multiple accounts, then the search function located in the top right will be a quick time-saver.
Understanding the Google Ads Editor Interface
Once you’ve set up your Google Ads Editor and downloaded your PPC accounts, you may be a bit confused as to what to do next.
Don’t worry, we’ll break it down into chunks for you:
- On the top left of the screen there is the basic campaign structure, which displays your current Campaigns (see image below):
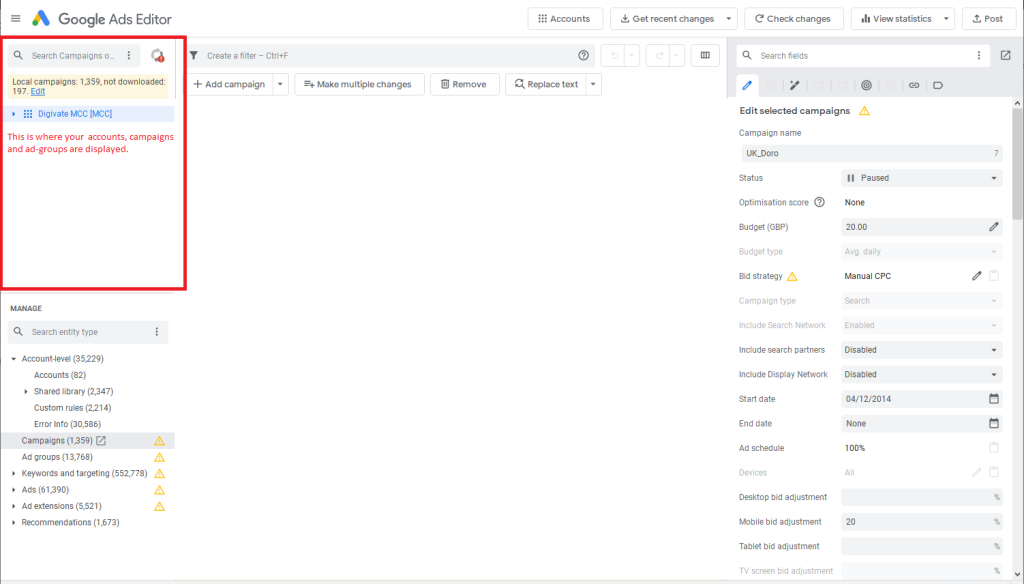
If you want to view the ad-groups, click on the small arrows to expand the menu.
2. On the bottom left of the page, you have the more granular aspects of your campaign like keyword listings, ads & ad-extensions.
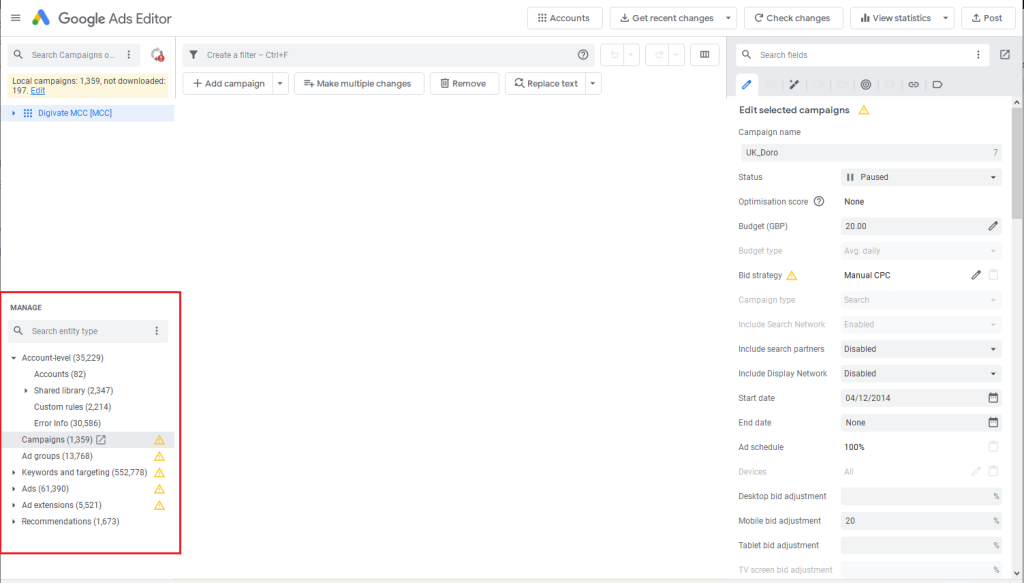
So, let’s say you wanted to look into your branded campaign ads. You’d click on your branded campaign/ad-group and then access the ads through the bottom left interface (see image below).
3. On the right-hand side of the page, you’ll see the section where you’ll be implementing most of your changes. You’re able to set up a budget, big strategy, ad scheduling & more (see image below):

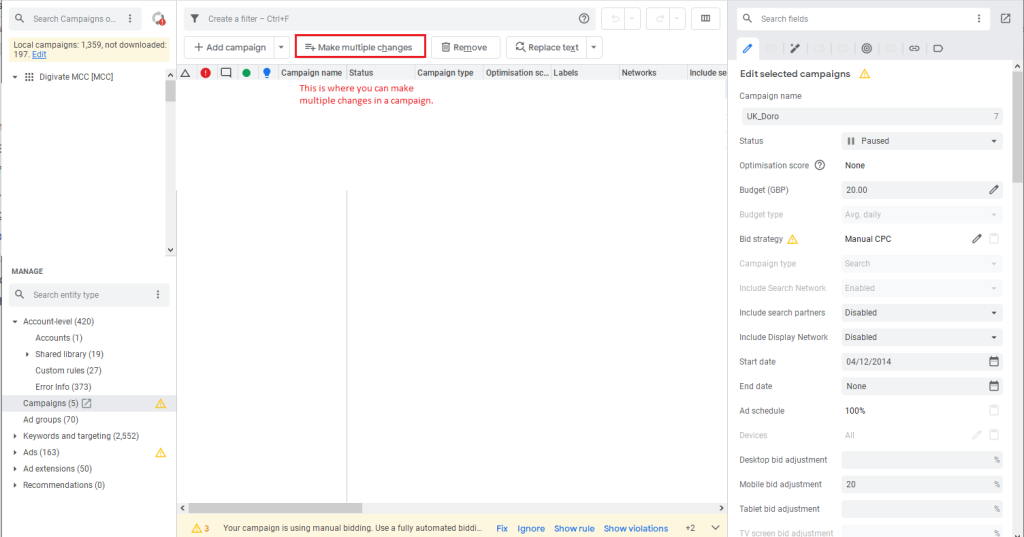
4. On the top of the page, click the “Make multiple changes” tab. This is where you can make bulk campaign edits:
5. Select the appropriate headers if you’re copy & pasting your clipboard. Like so:

6. Click “Process” once you have made all your desired changes, whether manually or by copying your clipboard:

This will process and make the additions to your campaign. Errors will come up on the screen if some changes cannot be applied.
7. Click “Post” if you want to confirm your changes and make them live. You’ll see this tab on the top right-hand corner of the Adwords editor.
How to Change Final URLs in Google Ads Editor
Changing the final URL is a common task for a Google Ads marketer.
You or your client may have updated and improved the landing pages of certain ad-groups.
A feature in Google Ads Editor is that it’ll allow you to change campaign and ad-group specific URLs in mere minutes so you don’t have to change them individually.
To do this, select the campaign or ad group you want to edit on the top left.
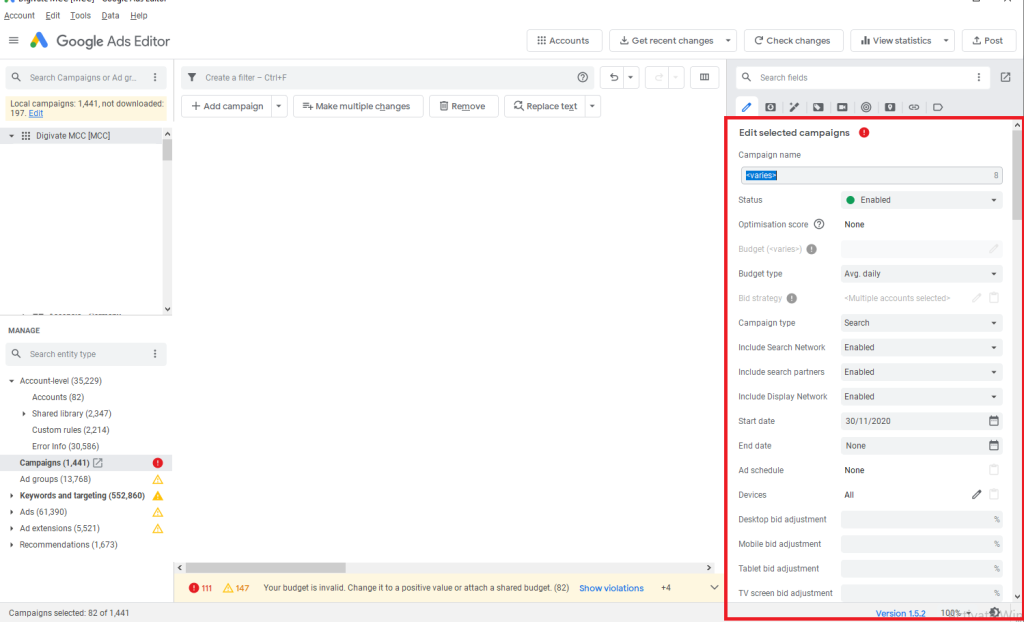
Next, on the bottom left, click on the “Ads” section and select the type of ad you want to edit.

You can copy & paste the final URL into the respective section and it’s done in a matter of minutes.
Just don’t forget to post your changes to make them go live.
How to Keep Your Work Up to Date on Google Ads Editor
Since Google Ads editor is an offline tool, it can have its drawbacks.
Whether you have multiple people working under the same account(s) or not, it’s important to be working with the most recent version of your account.
In order to do this, you can use the “Get Recent Changes” located in the top right corner of the menu bar or you can use the keyboard shortcut “Ctrl+T”:

The “Get Recent Changes” feature allows you to view the most recent changes. It’s a vital feature if the account is managed by multiple people as it keeps people on the same page.
How to Add Broad Match Modified Keywords to Google Ads Editor
Most PPC marketers know that broad match modified (BMM) is a key match-type for Google Ads campaigns.
But not all marketers use Google Ads Editor to make large key-word level changes and as a result – save lots of time.
Below is a step-by-step guide to adding Broad Match Modified Keywords to Google Ads Editor:
-
- Go to your Google Ads Editor
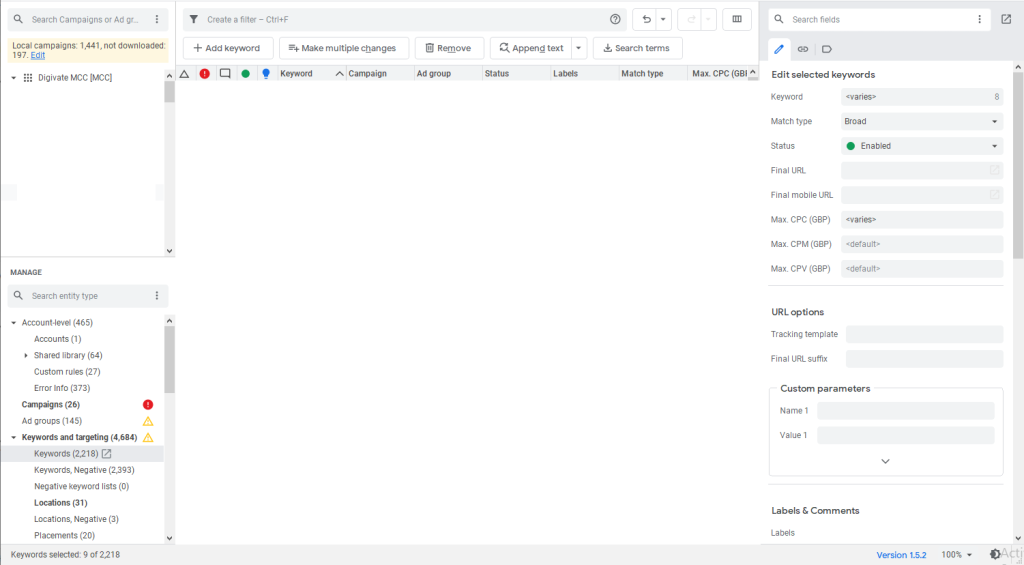
2. Select your campaign/ad-group then head to the bottom left menu and select the category “keywords”
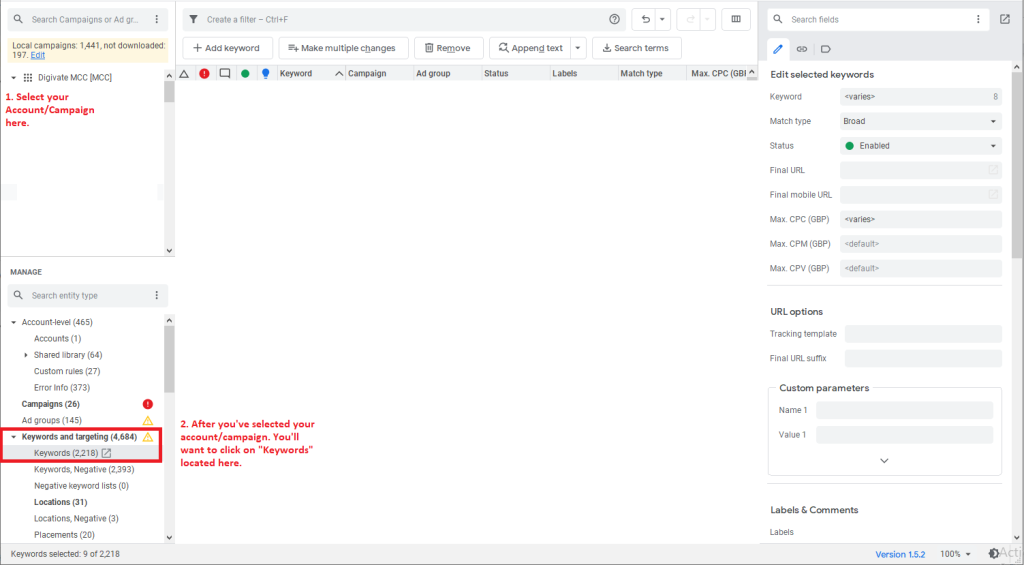
3. Select all the Broad-Match Keywords you want to change
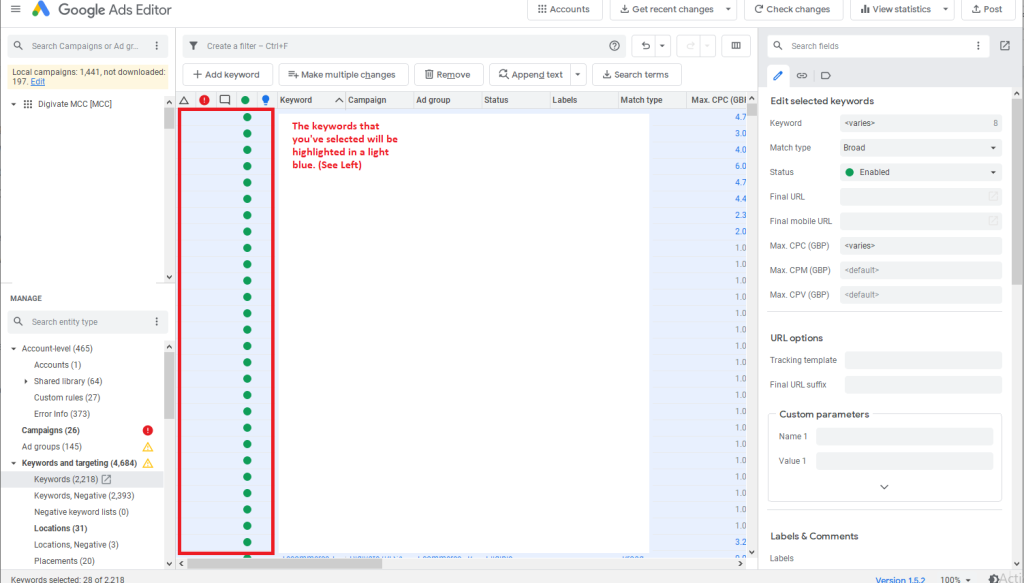
4. Once you’ve selected all the keywords you want to change to BMM, right-click, and replace text (Ctrl+H)

5. Then select the field “Keyword”. Following this, enter a space in the “Find Text” section. Then in the “Replace with” box enter a “+”

6. Now add a “+” to the first keyword. This is done through the “Append text” (Ctrl+Shift+H) option. You don’t have to do anything besides going into the “Replace with” box and entering a “+” sign then clicking okay.

How to Pull KPIs Into Adwords Editor
If you want to do a majority of your work in Google Ads, you can get the statistics of your accounts with the “View Statistics” feature.

View Statistics tab allows you to pull the most relevant metrics from Google Ads into the Google Ads Editor and allows you to see which keywords/campaigns/ad-groups are performing well and which aren’t.

In the statistics section, you’ll need to select the desired date range at the top right corner of the menu.

Then you can pull various metrics to look at such as CPC, CTR, Cost, Conversions.
You can do it all in Google Ads Editor directly.
Wrapping Up
Whether you’re an experienced marketer or a business owner looking to advertise your business, Google’s Adwords Editor is a very useful tool that will save you countless hours.
It is also the perfect tool for anyone who travels frequently or can’t always rely on stable wifi.
***
Keep learning about Google Ads or PPC:
6 Steps to Boost PPC Performance
10 Benefits of PPC Advertising


